How queues work, implementing AWS SQS for distributed workloads with NestJs

Today, it is important to have scalable systems to keep up with user demands but also keep costs in check, Queues (SQS) offload resource-intensive tasks to a queue, freeing up your application for other requests.
This article will attempt to give you a complete view of how queues work, their benefits, and how you could implement them in your project.
We’ll explore a project simple enough to understand the concepts but at the same time complex enough to see how you could take this example as the first stone to scale your application.
What are Queues?
A message queue is a messaging destination that uses the queue data structure to facilitate asynchronous communication between two services, commonly used in serverless and microservices architectures.
Distributed queues are useful for implementing the producer-consumer pattern in data-intensive applications. Producers generate tasks and place them in the queue, and then consumers take the tasks from the queue to process them.
Such queues have to be persistent and provide high performance and reliability. The queue must process all incoming messages and deliver them to consumers. If any problem occurs, it should be possible to process the same messages again.
There are three main components:
- Producers
- Queue
- Consumers (also known as a worker)
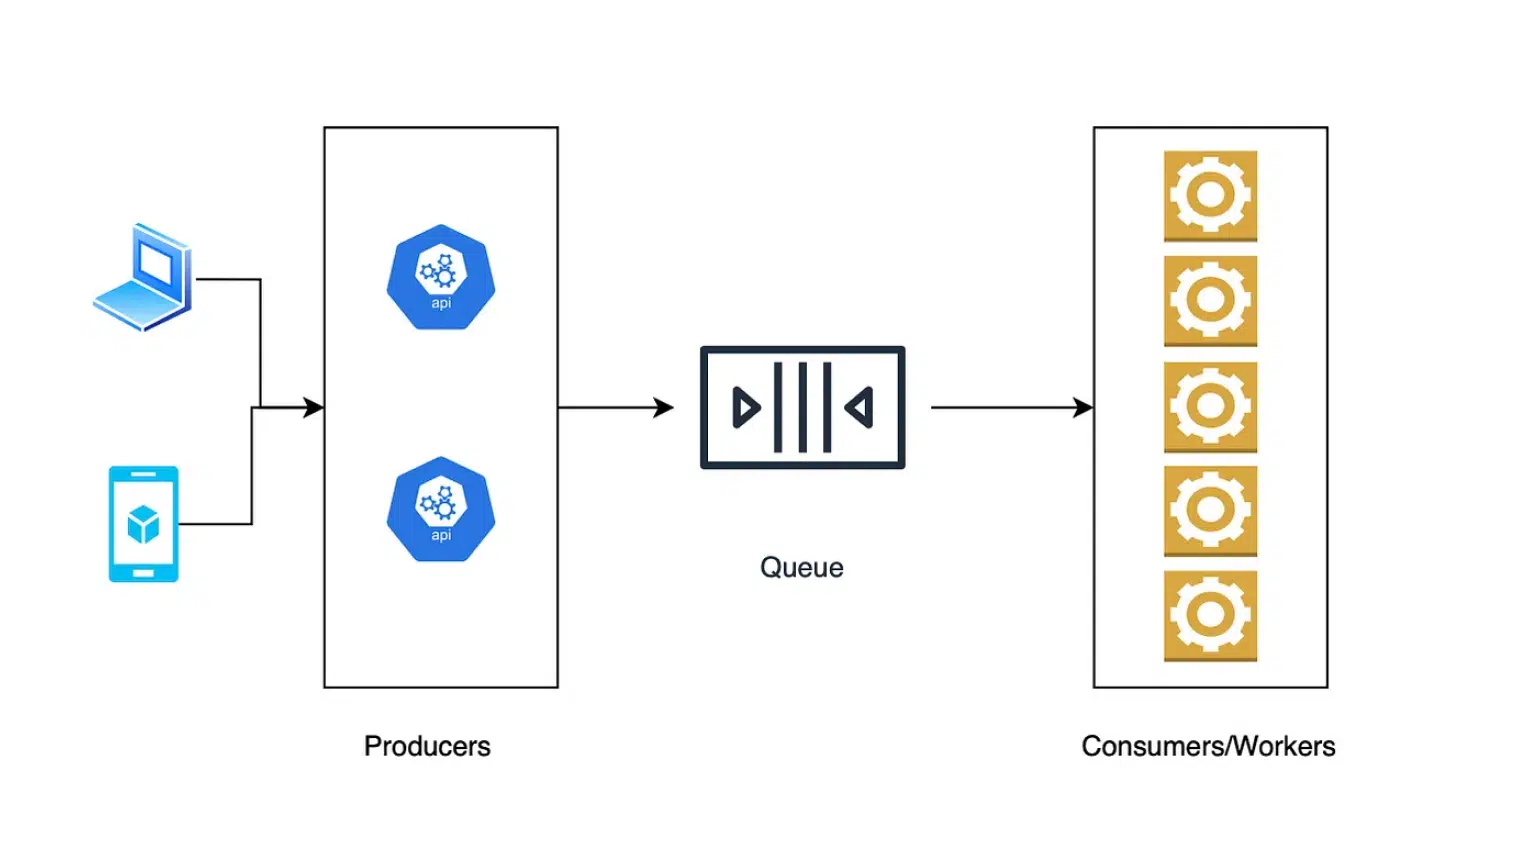
The life cycle would be as follows:
- The clients send a request
- The producer creates the message and sends it to the message queue if the Consumer is busy processing it immediately, the queue stores it until the Consumer is available.
- The Consumer retrieves the message from the queue and starts processing it.
- The message queue then temporarily locks the message to prevent it from being read by another consumer.
- After the Consumer completes the message processing, it deletes the message from the queue to prevent it from being read by other consumers.
- If a message fails it’s kept in the queue until a maximum number of attempts then it’s moved to a DLQ (dead letter queue)
This architecture allows an application to scale horizontally (producers and consumers independently).
FIFO vs STANDARD
Amazon SQS supports two types of queues: FIFO (first in, first out) and Standard. At this point we have a grasp of what a queue is, so we are going to focus in their key differences:
— FIFO ensures the strict order of message delivery, which reduces performance.
— Standard queues are based on the best-effort principle: new messages are sent regardless of whether the previous messages are delivered. Better performance
TLDR; It’s recommended to use FIFO only when strict order is required due to the performance tradeoff.
How dead-letter queues work
As mentioned, a dead-letter queue can be created/associated with a queue. When a message returns to the queue, its failed attempts counter is incremented. When the threshold is exceeded, the message is deleted from the queue, and its copy is created in the dead-letter queue. Then the user/administrator of the queue can analyze the causes of such behavior.
Development/Implementation
Please pay attention to this part, it is important to understand the decisions that were made for this example, this will let you have a critical mind on how to use queues for your own needs.
As Linus Torvalds once said “Talk is cheap, show me the code”, Now that we have a basic knowledge about queues let’s code a project where we can leverage its benefits.
Problem:
Let’s say a system needs to generate reports based on the userId within a date range, these reports take a long time to generate (10s — 20s).
Solution:
Implement Queues in the project to defer the work to avoid killing our server and allow horizontal scaling within a maximum number of instances to keep costs down.
Storage
For this solution, we are going to track the queues in a Postgres DB, Why? usually for long-running jobs, the client needs to poll to know when the request was completed, generally, this can be achieved by just calling an endpoint that queries a db where we can track the request and its status for this example we are going to consider that a report can have these statuses in-queue, in-progress, completed and failed.
We also need to take into account that the message size is low (256kb max) so for scenarios where you need to process high amounts of data per request an auxiliary storage is needed to store the data in this case for this example we are going to assume the message size exceeds the limit and we are going to store the payload in db in this way we can bypass the message size limit (for an image we would upload it to S3 and send the link as the message or save the URL in db, you get the idea…)
Also for more complex workloads, you may chain multiple queues and to orchestrate it a central storage is needed. the question of why we need a DB was answered but what about Postgres? Postgres was chosen simply because was an easy DB to set up so you can follow along, any DB (SQL or NoSQL) will be fine as long works as a centralized data source
Table schema
CREATE TABLE public.report_queue (
  id uuid NOT NULL,
  payload jsonb NOT NULL,
  status varchar NOT NULL,
  report_url varchar NULL,
  CONSTRAINT report_queue_pk PRIMARY KEY (id)
);
Consumer/Worker
Also, we are going to assume that each consumer/worker is a microservice that we can scale at the same rate, this is important because if you have a monolithic backend or the instances can handle multiple requests at the same time you can separate the consumer and scale it separately from the actual server that is doing the work.
Architecture
The architecture is basically the same as the diagram shown above, we’ll have a producer project, a Queue (AWS SQS), a consumer project, and a Postgresdb instance for shared storage.
- Queues: AWS SQS
- Producer: NestJs API
- Consumer: Nestjs API
- Database: Postgres
Sidenote: It’s possible to have the producers and consumers in the same project but that would depend on your needs, for didactical reasons we are going to keep them as separate projects to make the distinction between the components and the lifecycle obvious. Either way, there’s no “right” solution for every problem, feel free to modify/play with the solution suggested here.
A little summary of how the lifecycle for this application would look like:
- A client is going to hit the producer API /generate
- The producer is going to store the payload in db and get a reportId, then it’s going to send a message to the Queue containing the reportId to be processed.
- The queue is going to store the message and wait for a consumer to be available to take it.
- the consumer will take a message decode it mark the report as in-progress and start the processing after is finished will mark the report as completed and delete the message from the queue
- If the consumer fails to handle the message (e.g fails to generate the report) the main method will throw an exception and the event processing_error will be triggered then this will be handled by the consumer and mark the report as failed
- AWS-SQS will retry up to a maximum number of attempts (3 for this example)and move it to the DLQ if not handled successfully
Requirements
- AWS Account (AWS Free tier Account provides free 1 million SQS messages per month)
- Node Js (version 18+ recommended)
Repositories
https://github.com/2nal2/sqs-producer
https://github.com/2nal2/sqs-consumer
Setting Up
Step 1:
The first step is to configure an AWS SQS for our needs. The easiest way to get started with AWS SQS is through the AWS Console.
So to set up an SQS queue using the AWS console, follow these steps:
- Log in to the AWS console and navigate to the SQS service.
- Click the “Create New Queue” button.
- Choose a queue type (standard or FIFO) and provide a <name> for your queue.
- Configure the queue settings, such as the message retention period, maximum message size, and delivery delay. Click “Create Queue” to create your queue.
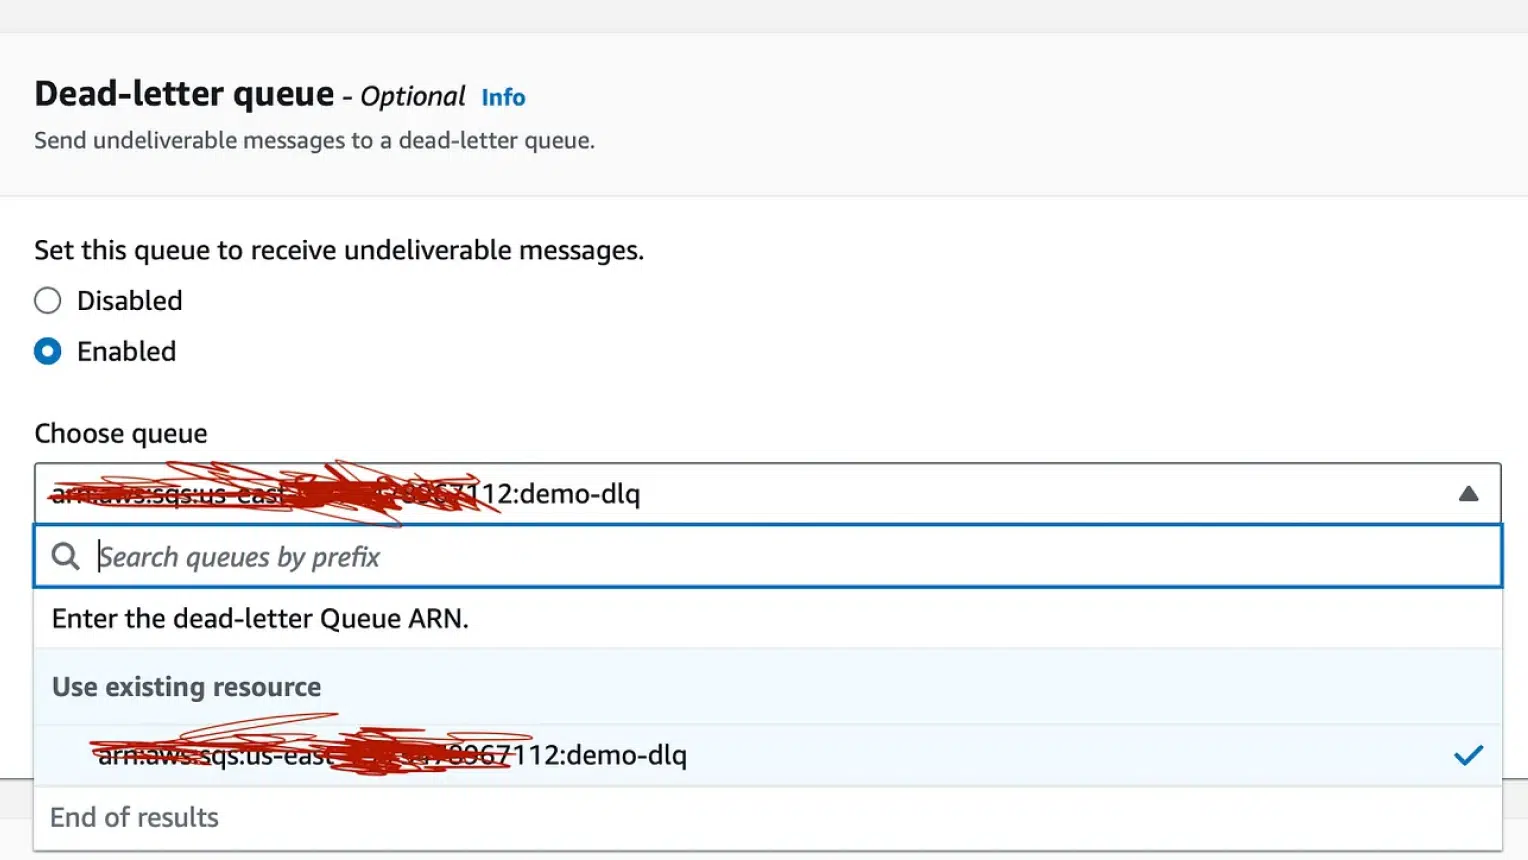
Step 2:
Then create another queue with the same name + dlq suffix, e.g demo-dlq
Step 3:
Go to your main Queue, click on ‘edit’ enable the DLQ feature, and associate your DLQ queue
Step 4:
Before you can interact with your SQS queue programmatically, you’ll need to ensure that your AWS access key pair has the appropriate permissions to work with SQS. To do this, you can either create a new IAM user with the necessary permissions or add the required permissions to an existing IAM user. Make sure to save the Access Key ID and Secret Access Key for this IAM user, as they will be needed to authenticate requests to SQS.
Step 5:
set up the Nest.js application, you’ll need to install the Nest.js CLI and create a new project. Here’s how you can do that:
npm install -g @nestjs/cli
nest new sqs-producernest
new sqs-consumer
install the following dependencies in both projects
"@aws-sdk/client-sqs"
"@nestjs/common"
"dotenv"
"@nestjs/core"
"@nestjs/sequelize"
"@ssut/nestjs-sqs"
"sequelize"
"sequelize-typescript"
"uuid"
Step 6:
Set up Postgres, create a Postgres instance
docker run -d --name sqsDemo -p 5432:5432 -e POSTGRES_PASSWORD=root postgres
Add the table
CREATE TABLE public.report_queue (
  id uuid NOT NULL,
  payload jsonb NOT NULL,
  status varchar NOT NULL,
  report_url varchar NULL,
  CONSTRAINT report_queue_pk PRIMARY KEY (id)
);
Step 7:
Write the producer, for this step, we are going to skip the coding for the repositories and DB connection
.env
REPORT_QUEUE_NAME=
#REPORT_QUEUE_URL=

 ## the AWS_ variables are required/consumed by the AWS v3 sdk, you won't find# an explicit use for KEY_ID or ACCESS_KEY inside the project

AWS_REGION= #
AWS_ACCESS_KEY_ID= #
AWS_SECRET_ACCESS_KEY= #

DATABASE_PORT=5432
DATABASE_HOST=localhost
DATABASE_DIALECT=postgres
DATABASE_USERNAME=postgres
DATABASE_PASSWORD=root
DATABASE_NAME=postgres
types
export enum ReportQueueStatus {
  IN_QUEUE = 'in-queue',
  IN_PROGRESS = 'in-progress',
  COMPLETED = 'completed',
  FAILED = 'failed',
}

// this is the actual request to handle
export interface ReportPayload {
   userId: number;
   startDate: string;
   endDate: string;
}

// this is the message that we'll be queued
export interface ReportQueuePayload {
  id: string; // this is the report id
}
src/producers/report/report.module.ts
import { Module } from '@nestjs/common';
import { SqsModule } from '@ssut/nestjs-sqs';
import { ReportProducerService } from './report.service';
import { config } from '../../config';

@Module({
  imports: [
    SqsModule.register({
     consumers: [],
     producers: [
        {
          name: config.REPORT_QUEUE_NAME,
          queueUrl: config.REPORT_QUEUE_URL,
          region: config.AWS_REGION,
        },
      ],
    }),
  ],
  controllers: [],
  providers: [ReportProducerService],
  exports: [ReportProducerService],
})
export class ReportProducerModule {}
src/producers/report/report.service.ts
import { Injectable } from '@nestjs/common';
import { SqsService } from '@ssut/nestjs-sqs';
import { config } from '../../config';
import { ReportPayload } from 'src/types/report-payload';
import { ReportQueueRepository } from 'src/repository/report-queue.repository';
import { ReportQueueStatus } from 'src/enums/report-queue-status.enum';
import { ReportQueue } from 'src/models/report-queue.model';
import { v4 } from 'uuid';

@Injectable()
export class ReportProducerService {
  constructor(
    private readonly sqsService: SqsService,
    private readonly reportQueueRepository: ReportQueueRepository,
  ) {}
  async sendMessage(body: ReportPayload) {
    try {
      // generate report with status in-queue to be processed later by a worker
     const report = await this.reportQueueRepository.insert({
        id: v4(),
        payload: body,
        status: ReportQueueStatus.IN_QUEUE,
      } as ReportQueue);

      // sends message to the queue with the report id
      await this.sqsService.send(config.REPORT_QUEUE_NAME, {
        id: v4(),
        body: JSON.stringify({
          id: report.id,
        }),
      });
      console.log(`message send it with report id: ${report.id}`);
    } catch (error) {
      console.log('error in producing message for report queue', error);
    }
  }
}
Finally, for the controller, we are going to generate random requests each time the endpoint is called to facilitate the emulation of different requests
src/app.service.ts
import { Injectable } from '@nestjs/common';
import { ReportProducerService } from './producers/report/report.service';

@Injectable()
export class AppService {
  constructor(private readonly producer: ReportProducerService) {}

  generateReport(): string {
    this.producer.sendMessage({
      userId: Math.floor(100000 * Math.random()),
      startDate: new Date().toISOString(),
      endDate: new Date().toISOString(),
    });
    return 'sended';
  }
}
src/app.controller.ts
import { Controller, Get } from '@nestjs/common';
import { AppService } from './app.service';

@Controller()
export class AppController {
  constructor(private readonly appService: AppService) {}

  @Get('/generarte')
  getHello(): string {
    return this.appService.generateReport();
  }
}
Step 8:
Write the consumer, for this project, we are going to reuse the same configuration (.env, types) from the producer
src/consumers/report/report-consumer.module.ts
import { Module } from '@nestjs/common';
import { SqsModule } from '@ssut/nestjs-sqs';
import { ReportConsumerService } from './report-consumer.service';
import { config } from '../../config';

@Module({
  imports: [
    SqsModule.register({
      consumers: [
        {
          name: config.REPORT_QUEUE_NAME,
          queueUrl: config.REPORT_QUEUE_URL,
          region: config.AWS_REGION,
        },      ],
      producers: [],
    }),
  ],
  controllers: [],
  providers: [ReportConsumerService],
})
export class ReportConsumerModule {}
src/consumers/report/report-consumer.service.ts
import { Injectable } from '@nestjs/common';
import {
  SqsConsumerEventHandler,
  SqsMessageHandler,
  SqsService,
} from '@ssut/nestjs-sqs';
import * as AWS from '@aws-sdk/client-sqs';
import { config } from '../../config';
import { Message } from '@aws-sdk/client-sqs';
import { ReportQueuePayload } from 'src/types/report-queue-payload';
import { ReportQueueRepository } from 'src/repository/report-queue.repository';
import { ReportQueueStatus } from 'src/enums/report-queue-status.enum';

@Injectable()
export class ReportConsumerService {
  constructor(private readonly reportQueueRepository: ReportQueueRepository) {}
  @SqsMessageHandler(config.REPORT_QUEUE_NAME, false)
  async handleMessage(message: AWS.Message) {
    // parse queue payload
    const queuePayload: ReportQueuePayload = JSON.parse(
      message.Body,
    ) as ReportQueuePayload;

    console.log(`Handling request for report ${queuePayload.id}`);

    // get original report request and mark report in progress
    const report = await this.reportQueueRepository.findById(queuePayload.id);
    report.status = ReportQueueStatus.IN_PROGRESS;
    await this.reportQueueRepository.update(report.toJSON());

    // Do some long running job (e.g get user information from db or some resource
    // and then upload to s3 and get the resource url)
    await new Promise((r) => setTimeout(r, Math.ceil(Math.random() * 10000)));

   // mark report as completed
    report.status = ReportQueueStatus.COMPLETED;
    report.reportUrl = 'https://example.com/report.pdf';
    await this.reportQueueRepository.update(report.toJSON());  }

@SqsConsumerEventHandler(config.REPORT_QUEUE_NAME, 'processing_error')
public async onProcessingError(error: Error, message: Message) {
  console.log(error, message);
    try {
      const payload: ReportQueuePayload = JSON.parse(
        message.Body,
      ) as ReportQueuePayload;

      const job = await this.reportQueueRepository.findById(payload.id);
      job.status = ReportQueueStatus.FAILED;
      await this.reportQueueRepository.update(job);
    } catch (error) {
      // log this error
      console.log(`error handling error`, error);
    }
  }
}
Done!
We have a full implementation of queues, I suggest you clone these projects start multiple consumer instances, and then fire multiple report requests and see how the load is being distributed between them and check how the DB is being updated, I hope that gives you an Eureka moment.
Repositories
https://github.com/2nal2/sqs-producer
https://github.com/2nal2/sqs-consumer