Real-Time Bidding Engine Using NestJS and Socket IO


What is Socket.IO?
Socket.io is a popular JavaScript library that allows us to create real-time, bi-directional communication between web browsers and a server. It is a highly performant and reliable library designed to process a large volume of data. It follows the WebSocket protocol and provides better functionalities, which enables us to build efficient real-time applications.
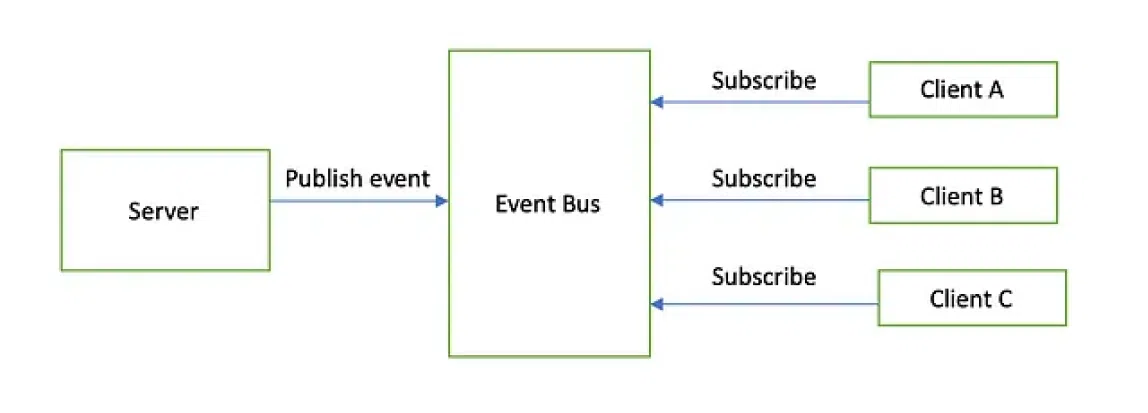
Publish-Subscribe Design Pattern
Publish-Subscribe also known as pub/sub is a commonly used design pattern for real-time communication between the client and the server. It allows the server to send messages to clients through a channel/medium in real time. The senders of these messages (publishers) do not explicitly identify the targeted recipients. Instead, the messages are sent out on a channel on which any number of recipients (subscribers) can be waiting for them.
- Publisher: Responsible for generating the events/messages for the intended audience.
- Subscriber: The audience that listens to the event or receives messages from publishers.
- Channel: A medium through which the data exchange takes place.
How Does Real Time Bidding Work?
We have seen several platforms where online bidding takes place but how does the bidding process work behind the picture, Let us look at the events taking place in the background:
- Suppose two users A and B visit an online auction platform at the same time.
- As soon as they show the intent of participating in the bidding, the web browser (client) subscribes to both the users to listen for ‘bid-placed’ events.
- There is another User C who placed the bid at the same time, and the bid request reaches the server.
- The server processes the request and then publishes the ‘bid-placed’ event for all the subscribers.
- Users A and B both have subscribed for the ‘bid-placed’ event, so they will receive the event from the server and the bid amount will be updated in real time.
- In this way all the users who visit the platform can see the bidding happening in real time and participate in it without even refreshing the web browser.
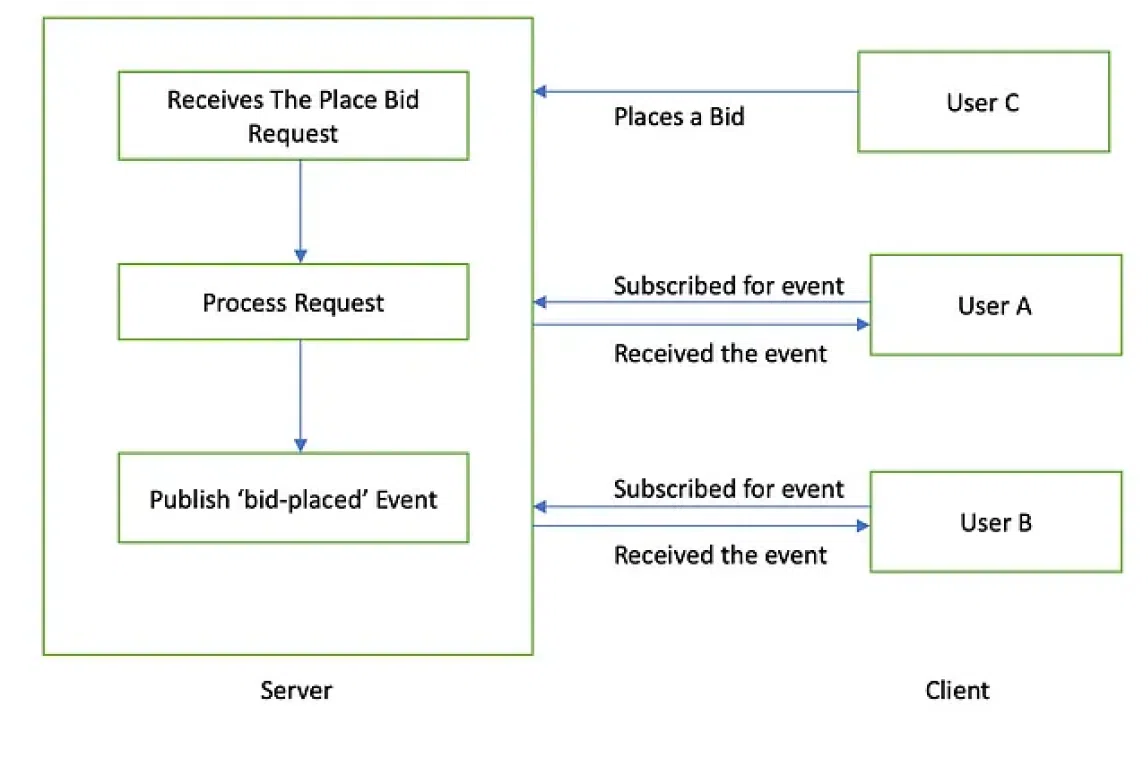
Real time bidding using pub/sub model
Concurrency Management
One of the key aspects of real-time bidding is to manage the concurrent transactions. Let us understand this scenario by taking a simple example, Three users A, B, and C are competing against each other in an online auction.
User A first placed a bid of $50k and is taking the lead, Now User B and C want to take the lead and place a bid of $60k at the same time, if there is no concurrency management both the bids will be placed successfully with the same amount. Ideally, the bid that reaches the server first must be placed and another bid must be rejected.
The problem of concurrent transactions can be solved easily using a linked list. For each auction, the bids will take place in the form of a linked list so each bid is connected to the last placed bid with a special unique constraint such that all the parent nodes in the linked list must be unique.
Let us revisit the example and see how a linked list solved the problem of concurrent transactions. User A when placing the bid initially to start the auction, the bid becomes the head of the linked list say with id — 5. Now for User B and C, the parent bid is 5, As soon as they both place the bid since the parent bid of both transactions is the same, the bid that will reach the server first will be processed and the other one will be rejected because of unique parent bid constraint.
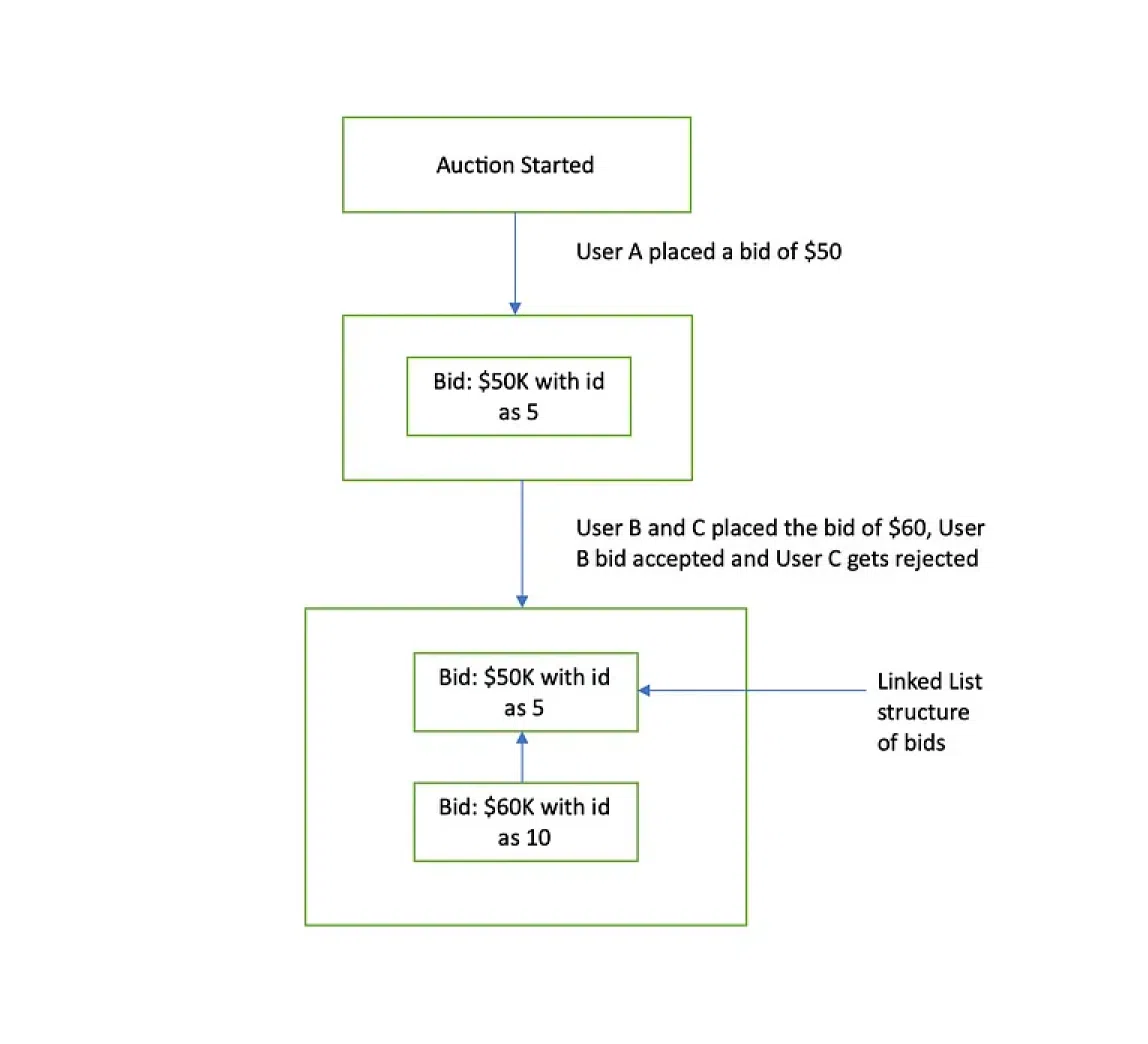
Linked list representation of concurrent bids
Implementation
1. Create a new NestJs project and install the required dependencies
$ npm i -g @nestjs/cli
$ nest new bidding-engine
$ npm i socket.io$ npm i ioredis
$ npm i –save sequelize sequelize-typescript mysql2
$ npm I –save-dev @types/sequelize
2. Create a Redis adapter to initialize pub/sub clients
export class RedisIoAdapter extends IoAdapter {
    private adapterConstructor: ReturnType;  constructor(
        app: INestApplication,
        private readonly configService: ConfigService,
) {
        super(app);
}

async connectToRedis(): Promise {
    const redisConfig = this.configService.get('redis');
    let publish: Redis | Cluster = new Redis({
        host: host,
        port: port,
});
    const subscribe = publish.duplicate();
    publish.on('error', (error) => {
        console.log('redis connection failed: ', error);
});
    subscribe.on('error', (error) => {
         console.log('redis connection failed: ', error);
});
    this.adapterConstructor = createAdapter(publish, subscribe);
}
createIOServer(port: number, options?: ServerOptions) {
   const server: Server = super.createIOServer(port, options) as Server;
   server.adapter(this.adapterConstructor);
   const webSocketConfig = this.configService.get('webSocket');
   const timeout: number =
        webSocketConfig?.websocketHearthbeatTimeout || 30000;
   setInterval(() => {
         const clients: Map = server.sockets.sockets;
         Object.keys(clients).forEach((socketId) => {
   const socket: Socket = clients[socketId] as Socket;
   if (socket.connected) {
         socket.send('ping');
      }
  });
}, timeout);

server.on('connection', (socket) => {
     socket.on('message', (message: string) => {
          if (message === 'pong') {
              const pingTimeout = socket['pingTimeout'] as { refresh: () => void };
pingTimeout.refresh();
          }
        });
     });
   return server;
  }
}
3. Once the adapter is created, let us integrate the adapter within the application to initialize the Redis and pub/sub-client
const redisIoAdapter = new RedisIoAdapter(app, configService);
await redisIoAdapter.connectToRedis();
app.useWebSocketAdapter(redisIoAdapter);
4. Now create a gateway that will allow the users to subscribe for the events and to publish the event as soon as the bid is placed.
@WebSocketGateway({
    cors: true,
    namespace: 'place-bid',
    transports: ['websocket'],
})
export class AuctionGateway {
    @WebSocketServer()
    private readonly server: Server;

@SubscribeMessage('place-bid-join')
async joinRoom(client: Socket, roomId: string): Promise {
   await client.join(roomId);
}

@SubscribeMessage('place-bid-leave')
async leaveRoom(client: Socket, roomId: string): Promise {
    await client.leave(roomId);
}
    public placeBidToRoom(roomId: string, payload: any): void {
        this.server.to(roomId).emit('new-bid-placed', payload);
   }
}
5. We have the adapter and gateway in place, Now we to create an API endpoint that will respond to the upcoming bids (takes the auctionId and bid amount), insert the bids in the database, check for concurrency, and publish the bid events. We’ll be creating different classes to handle the respective logic as follows:
The Bid Controller class will serve as the endpoint for placing a new bid.
The bid service class will handle the business logic and respective validations.
The bid repository class will handle the insertion of the bid and provide the last placed bid.
The bid base model represents the database view of the bid table.
@Controller()
export class BidController {
    constructor(
        private readonly bidService: BidService,
        private readonly appGateway: AuctionGateway,
) {}

@Post('bid')
@HttpCode(HttpStatus.OK)
async placeBid(@Body() request: { auctionId: string; bidAmount: number, parentBidId: string | null }) {
    const response = (await this.buyerService.placeBid(
        auctionId,
        bidAmount,
        parentBidId,
        )) as any;

const { bidDetails, auctionId } = response;
const wsResponse: any = {
     amount: bidDetails.value || 0,
     auctionId,
     bidId: bidDetails.id || '',
     createdAt: bidDetails.bidTime,
  };
this.appGateway.placeBidToRoom(request.auctionId, wsResponse);    return {
        success: true,
    };
  }
}
@Injectable()
export class BidService {
    constructor(
        private readonly sequelize: Sequelize,
        private readonly bidRepository: BidRepository,
) {}

        async placeBid(auctionId: string,
            bidAmount: number,
            parentBidId: string | null) {
try {
const bidCreated = await this.sequelize.transaction(
    async (transaction) =>
       this.bidRepository.create(
       {
         bidAmount,
         parentBid: parentBidId,
         auctionId,
       },
         transaction,
       ),
     );
const response = {
    auctionId,
    bidDetails: {
       bidTime: new Date(),
       id: bidCreated.id,
       value: bidCreated.bidAmount,
},
    success: true,
};
    return response;
} catch (error) {
if (
    error instanceof ValidationError &&
    error.name === 'SequelizeUniqueConstraintError'
) {
    const exception = {
        error: 'You have been outbid',
        details: {},
};
     throw new ConflictException(exception);
}
    if (error instanceof HttpException) {
    throw error;
}
     throw new InternalServerErrorException(error);
    }
  }
}
@Injectable()
export class BidRepository {
    constructor(@InjectModel(BidBase) private bidModel: typeof BidBase) {}
    create(bid: Partial, transaction: Transaction) {
        const data: Optional = {
            ...(bid as Required),
    };
    return this.bidModel.create(data, { transaction });
    }
    public async findLastBid(auctionId: string): Promise {
        return this.bidModel.findOne({
         where: {
           auctionId,
           },
           order: [['created_at', 'DESC']],
      });
   }
}
type CreationColumns = 'auctionId' | 'bidAmount' | 'parentBid';
export type CreateBidParams = Pick;

@Table({
    tableName: 'tbl_bid',
    underscored: true,
})
export class BidBase extends Model {
    @PrimaryKey
    @IsUUID('all')
    @Default(Sequelize.literal('NewId()'))
    @Column
    id!: string;

@Column
auctionId!: string;

@Column({ allowNull: true })
parentBid?: string;

@Column(DataType.DECIMAL(10, 2))
bidAmount!: number;

@CreatedAt
createdAt!: Date;

@UpdatedAt
updatedAt?: Date;

@DeletedAt
deletedAt?: Date;

@Column
createdBy?: string;

@Column
updatedBy?: string;

@Column
deletedBy?: string;}
6. Create a unique cluster index on parentBid and auctionId to prevent concurrent transaction problems. Also, create a foreign key on parentBid referencing to id of the bid base model to create the linked list structure.
7. Finally integrate the bid controller within the main application, your endpoint is now ready to handle bids and publish events to users.
Hurrah, we have successfully developed a real-time bidding engine using NestJs. You can integrate a fancy UI to listen for the bid events, provide the user login, and compete with your friends to win the auction. You can also create admin dashboards to see the upcoming bids, reject them in the process, and declare the winner “Goin once, Goin twice, you are the winner …..”.